Battery switch on travel trailer function is crucial for managing your RV’s power. Understanding how to use and maintain your battery switch is key to avoiding frustrating power outages and ensuring your appliances work smoothly. This guide will walk you through the different types of switches, troubleshooting common issues, and best practices for safe operation and maintenance.
We’ll cover everything from basic functionality to advanced troubleshooting, helping you become confident in managing your travel trailer’s power system. Whether you’re a seasoned RVer or a newbie, this guide will equip you with the knowledge to keep your power flowing on the road.
Understanding Battery Switch Functionality in Travel Trailers
Your travel trailer’s battery switch is a crucial component, controlling the flow of power between your trailer’s batteries and its electrical systems. Understanding how it works is key to maximizing your off-grid power and preventing electrical issues. This section will break down the functionality of these switches, helping you confidently manage your trailer’s power.
Types of Battery Switches, Battery switch on travel trailer function
Travel trailers typically utilize one of three main types of battery switches: a simple on/off switch, a two-battery switch, and a battery isolator. A simple on/off switch is the most basic, simply connecting or disconnecting the battery from the trailer’s electrical system. A two-battery switch allows you to select between two batteries (e.g., a house battery and a starting battery), or to combine both.
A battery isolator, often used in conjunction with a charging system, automatically manages power flow to prevent battery drain. The choice depends on your trailer’s setup and power needs.
Typical Wiring Diagram for a Battery Switch System
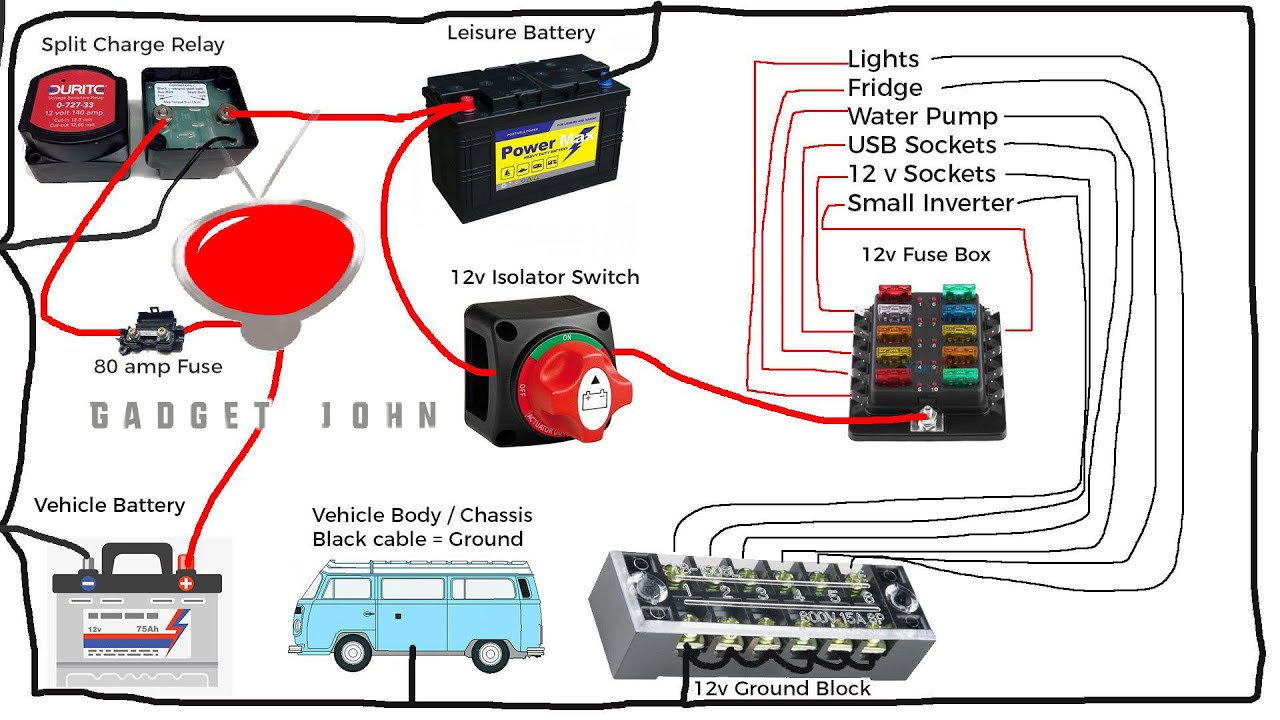
Imagine a basic diagram: Your battery (or batteries) is connected to the battery switch. From the switch, wires lead to the trailer’s 12V distribution panel. This panel then distributes power to various appliances and lights. A two-battery system would show two batteries connected to the switch, each with its own circuit to the panel. A battery isolator would be positioned between the battery and the switch, often including a charging system connection.
The exact configuration can vary based on the specific trailer model and the number of batteries used. A fuse or circuit breaker is typically included in the wiring near the battery to protect the system from overloads.
Proper Use of a Battery Switch
Using your battery switch correctly is vital for preventing accidental discharge and ensuring optimal battery life. Before connecting to shore power or starting your tow vehicle’s engine, make sure the switch is in the “off” position to prevent backfeeding from the vehicle’s alternator or shore power. When you want to use your trailer’s 12V system, turn the switch to the “on” position.
So, you’re an audiophile who travels? Awesome! Check out this guide on building the perfect audiophile travel setup for amazing sound on the go. Don’t forget to sort out your insurance before you leave; getting Aon travel insurance is a smart move to protect your precious gear and yourself while you’re exploring new places and enjoying your music.
Seriously, peace of mind is worth it – you wouldn’t want anything to happen to your high-end headphones or amp!
If you have a two-battery switch, select the appropriate battery or combine both as needed. Remember to always turn the switch to the “off” position when storing your trailer to prevent parasitic drain.
Advantages and Disadvantages of Different Battery Switch Designs
Simple on/off switches are inexpensive and easy to understand, but they lack the flexibility of more advanced designs. Two-battery switches offer greater control and the ability to prioritize battery usage, but they are slightly more complex. Battery isolators offer automatic management and protection against battery drain, but they are generally more expensive and require a more complex installation.
The best choice depends on your budget, technical skills, and power management needs. For example, a simple on/off switch might suffice for a small trailer with minimal electrical demands, while a battery isolator would be more suitable for a larger trailer with multiple batteries and extensive off-grid usage.
Battery Switch Types and Their Applications
Choosing the right battery switch for your travel trailer is crucial for managing your power sources efficiently and safely. Different types of switches offer varying levels of control and protection, making understanding their applications essential for a smooth and reliable RV experience. This section will clarify the common types and their best uses.
Travel trailers typically utilize a few key battery switch types, each designed for specific power management needs. The selection depends on the number of batteries you have and the level of control desired over their operation.
Single-Pole, Single-Throw (SPST) Battery Switches
The simplest type, an SPST switch, allows you to connect or disconnect a single power source (like your house battery) from a single circuit (like your interior lights). Think of it as a simple on/off switch for one battery. It’s a cost-effective option but offers limited control. For instance, you might use this to completely isolate your house battery from the trailer’s electrical system when it’s not in use.
Double-Pole, Single-Throw (DPST) Battery Switches
A DPST switch controls two circuits simultaneously with a single switch action. This is useful for applications where you want to switch both positive and negative terminals at once, enhancing safety. For example, a DPST switch can be used to simultaneously disconnect both positive and negative leads from your house battery, providing complete isolation and preventing accidental shorts.
Double-Pole, Double-Throw (DPDT) Battery Switches
Offering the most control, a DPDT switch allows you to switch between two different power sources to a single circuit. This is commonly used to switch between your house battery and shore power (hooked up to an external power source at a campground). With a single action, you can select either your house battery or shore power to feed your trailer’s electrical system, ensuring a seamless transition between sources.
It’s the most versatile option but also the most complex.
Comparison of Battery Switch Types
| Switch Type | Application | Benefits | Limitations |
|---|---|---|---|
| Single-Pole, Single-Throw (SPST) | Simple on/off control for a single battery or circuit. | Simple, inexpensive, easy to install. | Limited control; only one circuit can be controlled. |
| Double-Pole, Single-Throw (DPST) | Simultaneous control of both positive and negative leads for a single battery. | Improved safety by isolating both poles, preventing accidental shorts. | Can’t switch between multiple power sources. |
| Double-Pole, Double-Throw (DPDT) | Switching between two different power sources (e.g., battery and shore power). | Versatile, allows for seamless transition between power sources. | More complex, potentially more expensive to install. |
Troubleshooting Common Battery Switch Issues
Dealing with a malfunctioning battery switch in your travel trailer can be frustrating, leaving you without power when you need it most. Fortunately, many common problems are easily diagnosed and fixed with some basic troubleshooting. This section will guide you through identifying and resolving some of the most frequent issues.
Battery switch problems usually manifest as a complete lack of power to your trailer’s 12-volt system, or perhaps only partial power. Sometimes, the problem isn’t directly with the switch itself, but rather with related components like fuses or wiring. Corrosion is another significant culprit, especially in damp environments.
Identifying the Source of the Problem
Before diving into repairs, systematically check the most likely causes. Begin by visually inspecting the battery switch for any obvious signs of damage, such as loose connections, burned wires, or excessive corrosion around the terminals. Check all fuses associated with the battery switch and the 12-volt system. A blown fuse will often be visibly burnt or broken. If the fuses are intact, use a multimeter to check for voltage at the battery terminals and at the output side of the switch.
A significant voltage drop indicates a problem within the switch or its wiring. If you have multiple batteries, check the connections between them as well.
Troubleshooting Steps for Non-Functional Battery Switch
A step-by-step approach is crucial for efficient troubleshooting. This approach involves systematically checking components to isolate the fault.
The following flowchart visually represents the troubleshooting process:
Flowchart:
Start –> Inspect Switch for Damage (Loose Connections, Corrosion) –> Yes (Damage Found)? –> Clean/Repair Switch –> Test System –> Working? –> Yes (End) –> No (End)
No (No Damage) –> Check Associated Fuses –> Blown Fuse? –> Replace Fuse –> Test System –> Working? –> Yes (End) –> No (End)
No (Fuse Intact) –> Check Battery Voltage –> Low Voltage? –> Charge Batteries –> Test System –> Working? –> Yes (End) –> No (End)
No (Voltage Normal) –> Check Wiring Connections –> Loose/Damaged Wiring? –> Repair/Replace Wiring –> Test System –> Working? –> Yes (End) –> No (Problem Lies Elsewhere, Seek Professional Help)
Addressing Corrosion Issues
Corrosion on battery terminals and switch contacts is a common problem, especially in humid climates. Corrosion significantly reduces conductivity, leading to poor power delivery or complete failure. To address this:
First, disconnect the battery cables from the switch and the battery. Then, use a wire brush or sandpaper to clean the terminals and switch contacts until they are shiny and free of corrosion. Apply a corrosion inhibitor or dielectric grease to the cleaned surfaces to prevent future corrosion. Finally, reconnect the battery cables, ensuring tight connections.
Battery Switch Maintenance and Safety
Proper maintenance and safe handling of your travel trailer’s battery switch are crucial for ensuring reliable power and preventing accidents. Neglecting these aspects can lead to premature wear, electrical issues, and even potential hazards. This section Artikels a maintenance schedule and essential safety precautions to keep your system functioning optimally and safely.Regular maintenance of your battery switch will extend its lifespan and prevent unexpected failures while you’re on the road.
Ignoring potential problems can lead to inconvenient breakdowns and even more costly repairs. Safety is paramount when dealing with batteries and electricity; following proper procedures will minimize the risk of injury or damage.
Battery Switch Maintenance Schedule
A proactive maintenance approach is key to preventing problems. This schedule provides a guideline; adjust it based on your usage and environmental conditions.
- Monthly Inspection: Visually inspect the switch for any signs of corrosion, loose connections, or damage to the wiring. Tighten any loose connections and clean any corrosion with a wire brush and baking soda solution.
- Semi-Annual Cleaning: More thoroughly clean the switch and its connections. Use a battery terminal cleaner to remove corrosion and ensure a good electrical connection. Apply a dielectric grease to the terminals to prevent future corrosion.
- Annual Check and Lubrication: If your switch has moving parts (like a rotary switch), lubricate them with a suitable lubricant as recommended by the manufacturer. Inspect the entire system for any signs of wear and tear and address any issues immediately.
Safety Precautions When Working with Battery Switches and RV Batteries
Working with RV batteries and electrical systems requires caution. Always prioritize safety to prevent accidents.
- Disconnect the Battery: Before performing any maintenance on the battery switch or batteries, always disconnect the negative (-) terminal first. This prevents accidental short circuits.
- Wear Protective Gear: Use safety glasses to protect your eyes from splashing acid and gloves to protect your hands from corrosion. Consider using a respirator if working in a poorly ventilated area.
- Ventilation: RV batteries produce hydrogen gas, which is highly flammable and explosive. Ensure adequate ventilation when working near them. Never work near open flames or sparks.
- Proper Tools: Use insulated tools to prevent electrical shock. Never use metal tools that could short-circuit the battery terminals.
- Neutralize Spills: If battery acid spills, neutralize it immediately with baking soda and water. Follow the instructions on the baking soda container for safe cleanup.
Essential Tools and Materials for Battery Switch Maintenance
Having the right tools on hand will make maintenance easier and safer.
- Wire Brush: For cleaning corrosion from terminals.
- Baking Soda: To neutralize acid and clean corrosion.
- Battery Terminal Cleaner: For thorough cleaning and corrosion removal.
- Dielectric Grease: To prevent corrosion and improve electrical conductivity.
- Wrench (Appropriate Size): To tighten terminal connections.
- Screwdrivers (Phillips and Flathead): Depending on the switch type and its mounting.
- Safety Glasses: To protect your eyes.
- Gloves: To protect your hands.
- Insulated Tools (Optional but Recommended): To prevent electrical shock.
Connecting and Disconnecting Batteries
Connecting and disconnecting your travel trailer batteries safely is crucial for preventing damage to your electrical system and avoiding personal injury. Always remember to disconnect the negative (-) terminal first and reconnect it last. This helps prevent accidental shorts and sparks. The following steps detail the proper procedure when using a battery switch.Proper battery connection and disconnection procedures are essential for maintaining the health of your batteries and the overall electrical system in your travel trailer.
Incorrect procedures can lead to damage or even injury.
Dual Battery Wiring Diagram
Imagine a diagram showing two batteries (Battery 1 and Battery 2) each with a positive (+) and negative (-) terminal. A thick red wire runs from the positive terminal of Battery 1 to the positive terminal of the battery switch. A similar thick red wire runs from the other positive terminal of the battery switch to the positive input of your travel trailer’s electrical system.
Similarly, a thick black wire connects the negative terminal of Battery 1 to the negative terminal of the battery switch. Another thick black wire connects the negative terminal of the battery switch to the negative input of your travel trailer’s electrical system. A separate thick black wire runs from the negative terminal of Battery 2 directly to the negative terminal of Battery This creates a parallel connection, ensuring both batteries are available to power the trailer.
The battery switch controls the flow of power from the batteries to the trailer’s system. Important: All connections should be securely fastened using appropriately sized connectors and bolts, and the wires should be properly insulated to prevent shorts.
Connecting Batteries
Before connecting, ensure the battery switch is in the “OFF” position. This prevents accidental shorts while connecting the batteries. Begin by connecting the positive (+) cables securely. Then, connect the negative (-) cables, making sure all connections are tight and corrosion-free. Finally, switch the battery switch to the “ON” position.
Observe the system for any unusual behavior such as sparking or overheating.
Disconnecting Batteries
To disconnect, first switch the battery switch to the “OFF” position. This isolates the batteries from the trailer’s electrical system. Then, disconnect the negative (-) cables from both batteries. Finally, disconnect the positive (+) cables. This sequence minimizes the risk of sparks and short circuits.
Always double-check that all connections are properly disconnected before leaving your travel trailer unattended for extended periods.
Impact of Battery Switch on Travel Trailer Systems: Battery Switch On Travel Trailer Function
Your travel trailer’s battery switch is the central control for your off-grid power. Understanding its influence on various systems is key to efficient energy management and preventing unexpected power outages. This section details how the switch affects different trailer components and offers tips for maximizing battery life.The battery switch dictates which power source feeds your trailer’s systems – either the house batteries or shore power (from a campground hookup).
With the switch in the “off” position, all circuits are disconnected from the batteries, preventing drain. In the “house” position, power flows from your house batteries to lights, water pumps, and appliances. Switching to “both” allows you to charge your batteries while simultaneously powering the trailer from shore power, extending your battery life. The “shore” position only powers the trailer from shore power, bypassing the house batteries.
So, you’re an audiophile who travels? Awesome! Check out this guide on creating the perfect audiophile travel setup to keep your ears happy on the go. It’s all about packing light but smart. And while you’re planning your trip, don’t forget to sort out your travel insurance! Getting Aon travel insurance gives you peace of mind knowing your gear (and you!) are covered.
Happy travels!
Power Draw of Different Systems
Different systems in your travel trailer consume varying amounts of power. Understanding these differences helps in planning energy usage and preventing battery drain. For instance, LED lights draw significantly less power than incandescent bulbs, while a water pump requires a substantial amount of energy, especially during extended use. Larger appliances like air conditioners and microwaves are power hogs and should ideally be used only when connected to shore power.
A typical 12V water pump might draw 5 amps, while a single LED light might only draw 0.2 amps. Conversely, a microwave oven could draw 10 amps or more during operation. This disparity highlights the importance of managing energy consumption to prolong battery life. Using energy-efficient appliances and limiting the use of high-draw devices when off-grid will significantly extend your battery’s lifespan.
Maximizing Battery Life and Extending Battery Switch Lifespan
Properly managing your battery switch and understanding power consumption are crucial for maximizing battery life. Regularly checking your battery’s voltage using a multimeter is essential to gauge its charge level. Avoid leaving high-power appliances running unnecessarily. When not using the trailer for extended periods, turn the battery switch to the “off” position to prevent parasitic drain. This prevents small but constant draws from electronics that remain active even when turned off.
Cleaning the battery terminals regularly and applying a corrosion inhibitor will also improve battery performance and longevity. For the battery switch itself, ensure it’s securely mounted and all connections are tight. Periodically inspect the switch for any signs of damage or corrosion and replace it if necessary. Regular maintenance of both your batteries and the battery switch itself can significantly extend their operational lifespan, saving you time and money in the long run.
A simple act like regularly inspecting your battery connections can prevent premature failure.
Choosing the Right Battery Switch for Your Needs
Selecting the correct battery switch for your travel trailer is crucial for safe and reliable power management. The wrong switch can lead to insufficient power, overheating, or even dangerous electrical failures. This section will guide you through the process of choosing a switch that perfectly matches your trailer’s needs.Choosing the right battery switch involves considering several key factors related to your travel trailer’s electrical system and your power consumption habits.
You need to ensure the switch can handle the combined amperage draw of all your appliances and accessories, and that it’s compatible with your battery bank’s voltage. Furthermore, the switch’s construction quality and features will influence its longevity and ease of use.
Battery Switch Amperage and Voltage Ratings
The most important specifications to consider are the amperage and voltage ratings. The amperage rating indicates the maximum current the switch can safely handle. Your switch’s amperage rating must exceed the total amperage draw of all devices connected to your battery bank. For example, if your combined appliance and accessory draw is 100 amps, you’ll need a switch rated for at least 150 amps to provide a safety margin.
The voltage rating should match your battery bank’s voltage (typically 12V for most travel trailers). Using a switch with an insufficient amperage rating could cause overheating and potential fire hazards. Using a switch with an incorrect voltage will simply prevent the switch from working correctly.
Number of Battery Banks and Switch Poles
The number of battery banks you have will determine the number of poles your switch needs. A single-pole, double-throw (SPDT) switch is suitable for a single battery bank, allowing you to switch between battery and shore power. If you have two battery banks (e.g., one for house power and one for starting the vehicle), you’ll need a double-pole, double-throw (DPDT) or more complex switch configuration to manage both independently.
A higher number of poles increases complexity and cost but provides greater control and flexibility over multiple power sources.
Types of Battery Switches, Battery switch on travel trailer function
Several types of battery switches are available, each with its own advantages and disadvantages. Rotary switches are common and offer a simple, reliable method of switching between power sources. They are typically less expensive than electronic switches. Electronic switches, often incorporating features like digital displays and remote control capabilities, offer greater control and monitoring options but come at a higher cost.
Consider your budget and the level of control you require when making your selection.
Brand and Model Considerations
While various brands offer battery switches, factors like reputation, warranty, and customer reviews should guide your choice. Researching different brands and reading reviews can help you identify reliable and durable switches. A longer warranty often indicates the manufacturer’s confidence in the product’s quality. Checking online forums and reviews from other RV owners can provide valuable insights into real-world performance and reliability.
Key Specifications Checklist Before Purchasing
Before making a purchase, verify the following specifications:
- Amperage Rating: Ensure it exceeds your total amperage draw.
- Voltage Rating: Must match your battery bank’s voltage (usually 12V).
- Number of Poles: Corresponds to the number of battery banks you have.
- Switch Type: Rotary, electronic, or other types.
- Mounting Style: Panel mount or other options to fit your installation.
- Warranty: Check the length and terms of the manufacturer’s warranty.
Remember that selecting a correctly sized and appropriately rated battery switch is crucial for the safe and reliable operation of your travel trailer’s electrical system. Don’t hesitate to consult with an experienced RV technician if you’re unsure about which switch best suits your needs.
Mastering your travel trailer’s battery switch is a game-changer for any RV owner. By understanding its function, troubleshooting potential problems, and practicing safe maintenance, you can ensure reliable power for all your onboard systems. Remember, regular checks and preventative maintenance are your best allies in avoiding unexpected power failures and extending the life of your battery switch and batteries.
Happy travels!
User Queries
What size battery switch do I need?
The correct size depends on your trailer’s amperage draw. Check your trailer’s documentation or consult an RV electrician to determine the appropriate amperage rating for your battery switch.
How often should I check my battery switch?
Inspect your battery switch visually at least once a month for corrosion, loose connections, or damage. Check for any unusual smells or sounds as well.
What should I do if my battery switch is corroded?
Disconnect the batteries, clean the terminals and switch contacts with a wire brush and baking soda solution, and then apply a corrosion inhibitor. Replace the switch if corrosion is severe.
Can I use a battery switch with lithium batteries?
Yes, but ensure your switch is compatible with the higher voltage of lithium batteries. Some switches are specifically designed for lithium, and using an incompatible switch could be dangerous.
